Hadoop是分布式系统基础平台,主要存储数据挖掘计算任务的中间结果数据。
1、系统环境准备
| 注意 |
|---|
注意:如果服务部署集群,集群内所有服务器均需设置系统环境。 |
1.1防火墙配置
为了便于安装,建议在安装前关闭防火墙。使用过程中,为了系统安全可以选择启用防火墙,但必须启用服务相关端口。
1.关闭防火墙
临时关闭防火墙
| 代码块 |
|---|
|
systemctl stop firewalld
|
永久关闭防火墙
| 代码块 |
|---|
|
systemctl disable firewalld
|
查看防火墙状态
| 代码块 |
|---|
|
systemctl status firewalld
|
2.开启防火墙
相关服务及端口对照表:
| 服务名 | 需要开放端口 |
|---|
Hadoop | 50090,50070,9000,50010,50075,50020 |
如果确实需要打开防火墙安装,需要给防火墙放开以下需要使用到的端口
开启端口:50090,50070,9000,50010,50075,50020
| 代码块 |
|---|
|
firewall-cmd --zone=public --add-port=50090/tcp --permanent
firewall-cmd --zone=public --add-port=50070/tcp --permanent
firewall-cmd --zone=public --add-port=9000/tcp --permanent
firewall-cmd --zone=public --add-port=50010/tcp --permanent
firewall-cmd --zone=public --add-port=50075/tcp --permanent
firewall-cmd --zone=public --add-port=50020/tcp --permanent
|
配置完以后重新加载firewalld,使配置生效
查看防火墙的配置信息
| 代码块 |
|---|
|
firewall-cmd --list-all
|
3.关闭selinux
临时关闭selinux,立即生效,不需要重启服务器。
永久关闭selinux,修改完配置后需要重启服务器才能生效
| 代码块 |
|---|
|
sed -i 's/=enforcing/=disabled/g' /etc/selinux/config
|
1.2 安装Java环境
安装包解压到/opt目录
| 代码块 |
|---|
|
tar -zxvf jdk8.0.202-linux_x64.tar.gz -C /opt
|
配置java环境变量
①在/etc/profile 文件末尾添加,并保存
| 代码块 |
|---|
|
export  JAVA_HOME=/opt/jdk8.0.202-linux_x64
export  JRE_HOME=$JAVA_HOME/jre
export  CLASSPATH=.:$JAVA_HOME/lib:$JRE_HOME/jre/lib:$CLASSPATH
export  PATH=$JAVA_HOME/bin:$JRE_HOME/bin:$PATH
|
②使配置生效
③查看java版本信息
1.3取消打开文件限制
修改/etc/security/limits.conf文件在文件的末尾加入以下内容:
| 代码块 |
|---|
| language | bash |
|---|
| linenumbers | true |
|---|
|
vi /etc/security/limits.conf |
在文件的末尾加入以下内容:
| 代码块 |
|---|
| language | bash |
|---|
| linenumbers | true |
|---|
|
* soft nofile 65536
* hard nofile 65536
* soft nproc 131072
* hard nproc 131072 |
2、Hadoop单机部署
1.修改主机名-添加映射关系
根据部署实际环境,各个服务器主机名不同即可不修改主机名,如需修改,可参考下面的修改方式:
| 代码块 |
|---|
|
hostnamectl set-hostname 主机名 |
PS:主机名不能使用下划线
配置主机名和IP的映射关系
内容设置,例如:
| 代码块 |
|---|
|
127.0.0.1 localhost localhost.localdomain localhost4 localhost4.localdomain4
::1 localhost localhost.localdomain localhost6 localhost6.localdomain6
10.10.17.186 hadoop |
2.设置系统免密登陆
生成密钥
输入ssh-keygen后,连续按三次回车,不用输入其它信息
复制公钥
| 代码块 |
|---|
|
cat ~/.ssh/id_rsa.pub >> ~/.ssh/authorized_keys
chmod 0600 ~/.ssh/authorized_keys |
测试是否设置成功,例如:
如果不用输入密码,表示成功。
3.安装Hadoop
①创建hadoop相关目录
创建临时目录
| 代码块 |
|---|
|
mkdir -p /opt/hdfs/tmp |
创建namenode数据目录
| 代码块 |
|---|
|
mkdir -p /opt/hdfs/name |
创建datanode目录
注意这个目录尽量创建在空间比较大的目录,如有多个磁盘,可创建多个目录
| 代码块 |
|---|
|
mkdir -p /opt/hdfs/data |
②解压hadoop安装包到指定目录
| 代码块 |
|---|
|
tar -zxvf hadoop-2.7.3.tar.gz -C /opt |
③修改配置文件
1.修改hadoop-env.sh
| 代码块 |
|---|
|
cd /opt/hadoop-2.7.3/etc/hadoop
vi hadoop-env.sh |
找到export JAVA_HOME= ,修改Java安装路径如下所示
| 代码块 |
|---|
|
export JAVA_HOME=/opt/jdk8.0.202-linux_x64 |
找到export HADOOP_OPTS,在下面添加一行
| 代码块 |
|---|
|
export HADOOP_NAMENODE_OPTS="-XX:+UseParallelGC -Xmx4g" |
2、修改core-site.xml配置文件
| 代码块 |
|---|
| language | bash |
|---|
| linenumbers | true |
|---|
|
cd /opt/hadoop-2.7.3/etc/hadoop
vi core-site.xml |
内容如下:
| 代码块 |
|---|
| language | xml |
|---|
| linenumbers | true |
|---|
|
<configuration>
    <property>
        <name>fs.defaultFS</name>
        <!--根据实际情况替换成本机的IP或主机名 -->
        <value>hdfs://hadoop:9000</value>
    </property>
    <property>
        <name>hadoop.tmp.dir</name>
        <value>file:/opt/hdfs/tmp</value>
    </property>
    <property>
        <name>fs.trash.interval</name>
        <value>100800</value>
    </property>
</configuration> |
3、修改hdfs-site.xml配置文件
| 代码块 |
|---|
| language | bash |
|---|
| linenumbers | true |
|---|
|
cd /opt/hadoop-2.7.3/etc/hadoop
vi hdfs-site.xml |
内容如下:
| 代码块 |
|---|
| language | xml |
|---|
| linenumbers | true |
|---|
|
<configuration>
    <property>
        <name>dfs.name.dir</name>
        <value>file:/opt/hdfs/name</value>
    </property>
    <property>
        <name>dfs.data.dir</name>
        <value>file:/opt/hdfs/data</value>
    </property>
    <property>
        <name>dfs.replication</name>
        <value>1</value>
    </property>
    <property>
        <name>dfs.webhdfs.enabled</name>
        <value>true</value>
    </property>
</configuration> |
| 注意 |
|---|
注意:dfs.data.dir尽量配置在空间比较大的目录,可以配置多个目录,中间用逗号分隔 |
④配置hadoop环境变量
添加环境变量。
| 代码块 |
|---|
| language | bash |
|---|
| linenumbers | true |
|---|
|
vi /etc/profile |
在最底下添加下面内容:
| 代码块 |
|---|
| language | bash |
|---|
| linenumbers | true |
|---|
|
export HADOOP_HOME=/opt/hadoop-2.7.3
export PATH=$PATH:$HADOOP_HOME/bin |
让配置生效
| 代码块 |
|---|
| language | bash |
|---|
| linenumbers | true |
|---|
|
source /etc/profile |
4.启动Hadoop
①格式化hadoop
| 代码块 |
|---|
| language | bash |
|---|
| linenumbers | true |
|---|
|
cd /opt/hadoop-2.7.3/
./bin/hdfs namenode -format |
| 注意 |
|---|
|
仅第一次启动时需要执行格式化Hadoop操作,后续启动无需进行此操作 |
②启动hadoop
| 代码块 |
|---|
| language | bash |
|---|
| linenumbers | true |
|---|
|
cd /opt/hadoop-2.7.3/
./sbin/start-dfs.sh |
③创建中间数据存储目录(数据挖掘实验引擎集群需要使用)
| 代码块 |
|---|
| language | bash |
|---|
| linenumbers | true |
|---|
|
hdfs dfs -mkdir /sbimining
hdfs dfs -chmod 777 /sbimining |
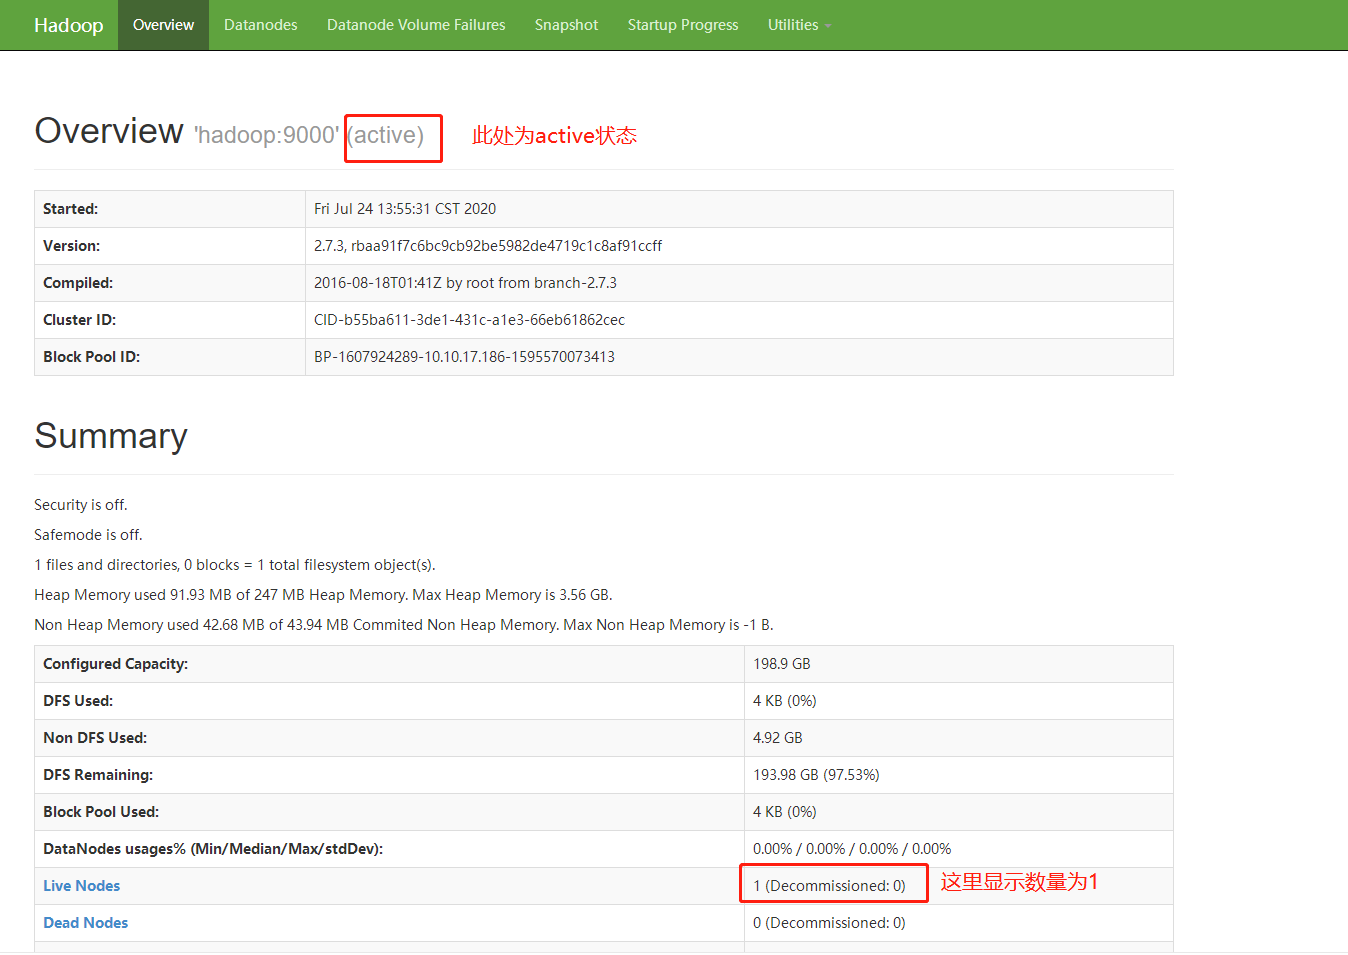
5.验证Hadoop
①在浏览器输入: http://本机ip:50070/dfshealth.html#tab-overview, 检查集群状态
②检查sbimining目录是否创建成功
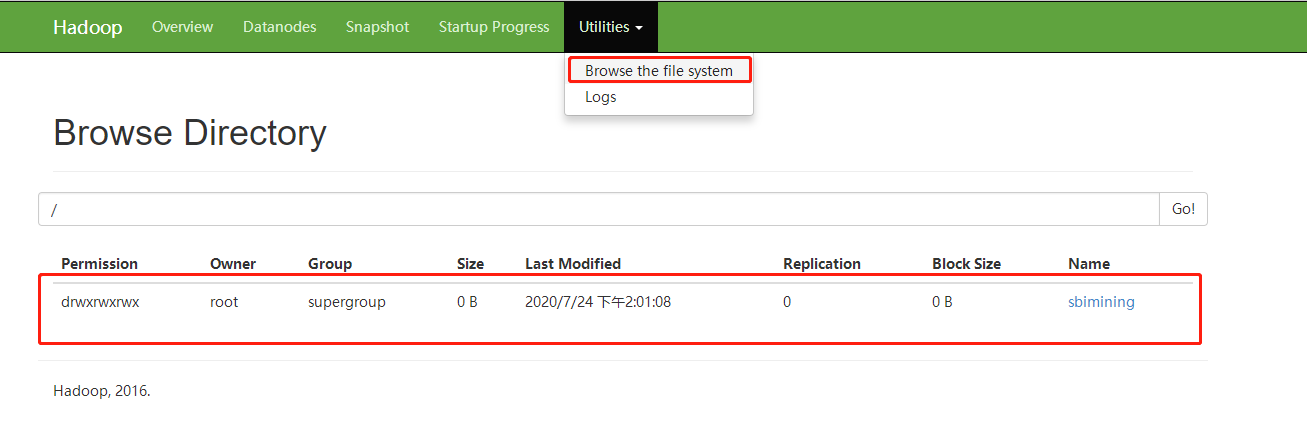
如上两图显示,表示Hadoop安装成功。
6.运维操作
停止hadoop
| 代码块 |
|---|
| language | bash |
|---|
| linenumbers | true |
|---|
|
cd /opt/hadoop-2.7.3/
./sbin/stop-dfs.sh |
启动hadoop
| 代码块 |
|---|
| language | bash |
|---|
| linenumbers | true |
|---|
|
cd /opt/hadoop-2.7.3/
./sbin/start-dfs.sh |
3、Hadoop集群部署
部署服务器:
| IP地址 | 主机名 | 角色 |
|---|
10.10.17.186 | hadoop | hadoop namenode,hadoop datanode |
10.10.17.127 | hadoop2 | hadoop datanode |
10.10.17.39 | hadoop3 | hadoop datanode |
1.修改主机名-添加映射关系
根据部署实际环境,各个服务器主机名不同即可不修改主机名,如需修改,可参考下面的修改方式:
| 代码块 |
|---|
|
hostnamectl set-hostname 主机名 |
PS:主机名不能使用下划线
配置主机名和IP的映射关系
内容设置,例如:
| 代码块 |
|---|
|
127.0.0.1 localhost localhost.localdomain localhost4 localhost4.localdomain4
::1 localhost localhost.localdomain localhost6 localhost6.localdomain6
10.10.17.186 hadoop
10.10.17.127 hadoop2
10.10.17.39 hadoop3 |
2.设置系统免密登陆
生成密钥
输入ssh-keygen后,连续按三次回车,不用输入其它信息
复制公钥
| 代码块 |
|---|
|
ssh-copy-id -i ~/.ssh/id_rsa.pub root@hadoop
ssh-copy-id -i ~/.ssh/id_rsa.pub root@hadoop2
ssh-copy-id -i ~/.ssh/id_rsa.pub root@hadoop3 |
如果以上命令执行失败,可以手工把每个节点 ~/.ssh/id_rsa.pub的数据追加到其它节点的~/.ssh/authorized_keys文件中, 如果~/.ssh/authorized_keys不存在,可以新建一个.
测试是否设置成功,例如:
| 代码块 |
|---|
|
ssh root@hadoop
ssh root@hadoop2
ssh root@hadoop3 |
如果不用输入密码,表示成功。
3.创建Hadoop相关目录
创建hadoop相关目录(集群每个节点均需操作)
创建临时目录
| 代码块 |
|---|
|
mkdir -p /opt/hdfs/tmp |
创建namenode数据目录
| 代码块 |
|---|
|
mkdir -p /opt/hdfs/name |
创建datanode目录
注意这个目录尽量创建在空间比较大的目录,如有多个磁盘,可创建多个目录
| 代码块 |
|---|
|
mkdir -p /opt/hdfs/data |
4.在管理节点安装配置Hadoop
例如在hadoop节点执行
①解压hadoop安装包到指定目录
| 代码块 |
|---|
|
tar -zxvf hadoop-2.7.3.tar.gz -C /opt |
②修改配置文件
1.修改hadoop-env.sh
| 代码块 |
|---|
|
cd /opt/hadoop-2.7.3/etc/hadoop
vi hadoop-env.sh |
找到export JAVA_HOME= ,修改Java安装路径如下所示
| 代码块 |
|---|
|
export JAVA_HOME=/opt/jdk8.0.202-linux_x64 |
找到export HADOOP_OPTS,在下面添加一行
| 代码块 |
|---|
|
export HADOOP_NAMENODE_OPTS="-XX:+UseParallelGC -Xmx4g" |
2、修改core-site.xml配置文件
| 代码块 |
|---|
| language | bash |
|---|
| linenumbers | true |
|---|
|
cd /opt/hadoop-2.7.3/etc/hadoop
vi core-site.xml |
内容如下:
| 代码块 |
|---|
| language | xml |
|---|
| linenumbers | true |
|---|
|
<configuration>
    <property>
        <name>fs.defaultFS</name>
        <!--根据实际情况替换成本机的IP或主机名 -->
        <value>hdfs://hadoop:9000</value>
    </property>
    <property>
        <name>hadoop.tmp.dir</name>
        <value>file:/opt/hdfs/tmp</value>
    </property>
    <property>
        <name>fs.trash.interval</name>
        <value>100800</value>
    </property>
</configuration> |
3、修改hdfs-site.xml配置文件
| 代码块 |
|---|
| language | bash |
|---|
| linenumbers | true |
|---|
|
cd /opt/hadoop-2.7.3/etc/hadoop
vi hdfs-site.xml |
内容如下:
| 代码块 |
|---|
| language | xml |
|---|
| linenumbers | true |
|---|
|
<configuration>
    <property>
        <name>dfs.name.dir</name>
        <value>file:/opt/hdfs/name</value>
    </property>
    <property>
        <name>dfs.data.dir</name>
        <value>file:/opt/hdfs/data</value>
    </property>
    <property>
        <name>dfs.replication</name>
        <value>1</value>
    </property>
    <property>
        <name>dfs.webhdfs.enabled</name>
        <value>true</value>
    </property>
</configuration> |
| 注意 |
|---|
注意:dfs.data.dir尽量配置在空间比较大的目录,可以配置多个目录,中间用逗号分隔 |
4、修改slaves配置文件
| 代码块 |
|---|
| language | bash |
|---|
| linenumbers | true |
|---|
|
cd /opt/hadoop-2.7.3/etc/hadoop
vi slaves |
把所有的datanode的主机名添加到文件中,例如:
| 代码块 |
|---|
| language | bash |
|---|
| linenumbers | true |
|---|
|
hadoop
hadoop2
hadoop3 |
5.分发Hadoop安装包(管理节点执行)
将hadoop管理节点上的hadoop安装包分发到其他节点:
| 代码块 |
|---|
| language | bash |
|---|
| linenumbers | true |
|---|
|
scp -r /opt/hadoop-2.7.3 root@hadoop2:/opt
scp -r /opt/hadoop-2.7.3 root@hadoop3:/opt |
6.配置Hadoop环境变量(每个节点执行)
添加环境变量。
| 代码块 |
|---|
| language | bash |
|---|
| linenumbers | true |
|---|
|
vi /etc/profile |
在最底下添加下面内容:
| 代码块 |
|---|
| language | bash |
|---|
| linenumbers | true |
|---|
|
export HADOOP_HOME=/opt/hadoop-2.7.3
export PATH=$PATH:$HADOOP_HOME/bin |
让配置生效
| 代码块 |
|---|
| language | bash |
|---|
| linenumbers | true |
|---|
|
source /etc/profile |
7.启动Hadoop集群
①格式化hadoop(管理节点执行)
| 代码块 |
|---|
| language | bash |
|---|
| linenumbers | true |
|---|
|
cd /opt/hadoop-2.7.3/
./bin/hdfs namenode -format |
| 注意 |
|---|
|
仅第一次启动时需要执行格式化Hadoop操作,后续启动无需进行此操作 |
②启动hadoop
| 代码块 |
|---|
| language | bash |
|---|
| linenumbers | true |
|---|
|
cd /opt/hadoop-2.7.3/
./sbin/start-dfs.sh |
③创建中间数据存储目录(数据挖掘实验引擎集群需要使用)
| 代码块 |
|---|
| language | bash |
|---|
| linenumbers | true |
|---|
|
hdfs dfs -mkdir /sbimining
hdfs dfs -chmod 777 /sbimining |
8.验证Hadoop集群